Showing posts with label crafts. Show all posts

Thursday, February 6, 2014

All you need is love. And candy. And a trip to the craft store. But that's it.

To raise money for our annual church retreat, the choir (my peeps!) and I banded together for a "crafternoon" full of sweet sweet goodness. We made candy bouquets to sell, which involved mass-producing 7 different kinds of Valentine-themed candies on sticks, then putting them in vases filled with, you guessed it, more candy.

Just one of these projects would probably make enough for a child's classroom, or a nurse's station, or your back-of-the-closet secret after a hard day. I'm listing them here by the fewest number of ingredients.  If you're not diabetic by the time you're done, you have noone to blame but yourself!

  1. Tootsie pop flowers
  2. Chocolate-dipped pretzel rods
  3. Chocolate kiss roses
  4. Upcycled candy cane hearts
  5. Oreo pops
  6. Chocolate-covered Peep hearts
  7. Rice Krispie Heart pops
  8. Master list of materials and ingredients for overachievers

1. Tootsie pop flowers

Can't take the credit for this photo, but you can see the ones I did in the photo at the bottom of the page.
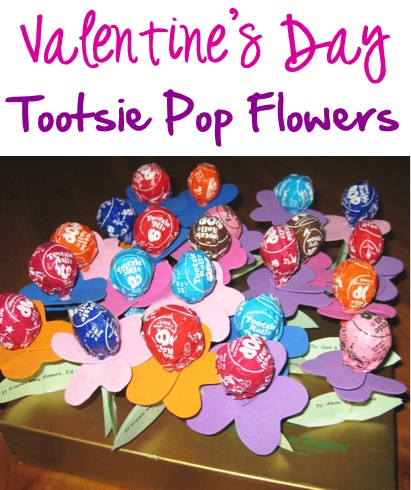
Required:

  1. Bag of Tootsie Roll pops
  2. 2 sheets of cardstock, scrapbooking paper, or foam
  3. Small hole punch

    Optional:

    • Heart shape paper punch (It won't work with the foam, but if you use paper it makes the process so.much.faster.)
    • Green paper (for leaves)
    • Scotch tape
    This one is also very easy. I used the instructions from here. If you have trouble getting the petals to stay up once they're on the stick, wrap some scotch tape around the stick.

    2. Chocolate-dipped pretzel rods

    Required:

    1. Chocolate to melt (I'd say about 2 12-ounce bags of chocolate chips)
    2. 1 bag of pretzel rods
    3. Tall glass (microwave-safe)
    4. Tall cellophane bags and twist ties (Or Ziploc bags with the zips cut off and pipe cleaners cut into short pieces)
    5. Parchment or wax paper

    Optional:

    • Contrasting color of chocolate
    • Sprinkles* 
    This one is so easy!!
    • Pour 1 bag of chocolate chips into your glass (or fill with chopped chocolate). You can go all the way to the top - it will take up less space as the chocolate melts. Zap in the microwave for 30 seconds, then stir (I used a wooden skewer). Repeat. You should be able to stir it at this point, and you want to, as many of the chips will melt as you stir. If even after your best stirring efforts there are lumps, zap it again for 15 seconds and stir again.*
    • Open the bag of pretzel rods and spread your parchment or wax paper on a flat surface. 
    • Dip the pretzel rods into the chocolate, turning to coat well and shaking off the excess before laying the pretzel on the paper to dry. As the level of chocolate goes down, you may need to tip the glass to coat the pretzel as far up as you can.
    • You'll probably have to refill the chocolate halfway through the bag. Use the same method as before.
    When all the pretzels are dipped, you can just just walk away. But where's the challenge in that???
    • Melt the contrasting color of chocolate (My favorite method for this particular use is to nuke a couple of handfuls of chips in a mostly-closed Ziploc bag for 30 seconds, then massage the bag until it's smooth, snip off a corner, and go!) and drizzle over the coated pretzels. While the chocolate is still wet, shake sprinkles over the pretzels.
    • Let the chocolate dry for a couple of hours. If you touch it lightly and it leaves a fingerprint, let it dry some more.
    • Bag 'em and go!

    3. Chocolate Kiss Roses


    Required:

    1. Bag of Hershey Kisses
    2. Pink or red tissue paper (the kind you use to stuff gift bags and boxes)
    3. Floral wire (18 gauge worked great, but I also used pipe cleaners and heard a rumor that wooden skewers work)
    4. Floral tape
    5. Glue dots

      Optional:

      • Wired leaves 

      Method

      I listened to the Internet on this one, but their advice produced slightly warped rosebuds and sore fingers. Plus, they took forever. My method produced a couple dozen flowers in the time it took to watch Downton Abbey.
      • Cut the flower wire to make between  9-12 inch pieces.
      • Cut the tissue paper into 6-inch squares.
      • Stick a glue dot on the bottom of a kiss and stick the bottom of another kiss to it. 

      • Put a glue dot on the side of one of the kisses, near the pointy end.
      • Hold the end of one of the wires against the glue dot on the side.

      • Center two pieces of tissue paper over the top pointy end of the candy. Pull the sides of the tissue out straight and crease.


      • Wrap tissue clockwise around candy, holding the paper pretty firmly. Keep twisting all the way to the base of the candies. Secure with a bit of tape if needed.


      • Holding one end of the floral tape against the bottom third of the candy portion, start pulling the tape gently and wrapping it around to form a stem. (Pulling the tape activates a mild wax that will make the tape stick to itself.)

      • Once you get past the bulky portion at the end of the tissue paper, add two leaves and continue wrapping down the wire to the end. Just rip off the tape and smooth it down to finish.

      To be fair, I stole some of the instructions from here.

      4. Upcycled Candy Cane Hearts**

      Not my picture, I can't take credit, but I thought y'all would like to know what they look like!

      Required:

      1. Chocolate for melting (the amount depends entirely on how many candy canes you have, but don't try it with less than 8 oz.)
      2. As many leftover candy canes as you scrounge together. The link I'll post below uses the mini ones, but all I could find at the 90% off after-Christmas sale were the big ones, and they worked fine.
      3. Microwave safe bowl
      4. 6 inch lollipop sticks (You could use wooden skewers, just beware of the sharp tips)
      5. Cellophane bags and twist ties (Or Ziploc bags with the zips cut off and pipe cleaners cut into short pieces)
      6. Parchment or wax paper
      Optional:
      • Heat-proof gloves (otherwise your fingertips get a little toasty)
      • Sprinkles* or conversation hearts (can stick to the chocolate while it's wet)
      • Contrasting color of chocolate
      I used these instructions. The only thing I did differently was to use the big candy canes, which should be baked and extra minute or two to make them pliable.

      5. Oreo Pops

      Required:

      1. Candy coating (or chocolate chips)
      2. 1 package of Oreos
      3. Microwave-safe bowl (a coffee mug works great for this)
      4. 6 inch lollipop sticks (or Popsicle sticks or wooden skewers, just beware of the sharp tips)
      5. Cellophane bags and twist ties (Or Ziploc bags with the zips cut off and pipe cleaners cut into short pieces)
      6. Parchment or wax paper

        Optional:

        • Sprinkles* or conversation hearts (can stick to the chocolate while it's wet)
        • Contrasting color of chocolate
        The instructions are here. I have good news and bad news here. You have to dig the trenches, or it just won't work. Yes, even if you buy Double Stuffed. The good news is that if you break it, you bite it.

        6. Chocolate-covered Peep Hearts


        Required:

        1. Candy coating (this recipe says 8 oz; you can also use chocolate chips)
        2. 2 tblsp vegetable shortening
        3. 1 package of Peep hearts (8 hearts)
        4. Tall glass (microwave-safe)
        5. 6 inch lollipop sticks (I have used Popsicle sticks or plastic forks before. You could also use wooden skewers, just beware of the sharp tips)
        6. Cellophane bags and twist ties (Or Ziploc bags with the zips cut off and pipe cleaners cut into short pieces)
        7. Parchment or wax paper
          Optional:
          • Sprinkles* or conversation hearts (can stick to the chocolate while it's wet)
          These instructions work great!

          7. Rice Krispie Heart Pops


          Required:

          1. Candy coating (or chocolate chips)
          2. Box of Rice Krispies cereal
          3. Bag of marshmallows
          4. 1/4 cup butter
          5. Large microwave-safe bowl 
          6. Heart-shaped cookie cutters (any shape works, or instead of cutting out the treats, pour them directly into the wells of a well-greased muffin tin)
          7. Smaller bowl for melting chocolate
          8. 6 inch lollipop sticks (or Popsicle sticks or wooden skewers, just beware of the sharp tips)
          9. Cellophane bags and twist ties (Or Ziploc bags with the zips cut off and pipe cleaners cut into short pieces)
          10. Parchment or wax paper
          11. Cooking spray

          Optional:

          • Sprinkles* (can stick to the chocolate while it's wet)
          • Contrasting color of chocolate

          Method

          • Line a cookie sheet with parchment or wax paper.
          • Melt butter in the large bowl in the microwave (30 seconds should do it). Dump in the bag of marshmallows and stir to coat.Microwave for 45 seconds.
          • SPRAY A SPATULA WITH COOKING SPRAY. It's important. Don't question it.
          • Stir the gooey mess, then nuke for another 30-45 seconds. Stir again until it's a uniform melted goo consistency. Add Rice Krispies right away and stir.
          • SPRAY THE SPATULA AGAIN WITH COOKING SPRAY.
          • Pour the contents of the bowl onto the lined cookie sheet and use the spatula to flatten it out until it's roughly an inch thick. Let it cool for about half an hour, it'll be easier to cut.
          • SPRAY THE COOKIE CUTTER WITH COOKING SPRAY.
          • Cut out the hearts and lay them on parchment or wax paper.
          • Melt a few spoonfuls of chocolate in a bowl. Dip the end of each lollipop stick into the melted chocolate before sticking it into the point of the heart-shaped treats.
          • Once all of the treats have sticks, melt more chocolate(s) and drizzle over the hearts. Add sprinkles while the chocolate is still wet. Let the chocolate dry completely before bagging. 

          Master list of ingredients for overachievers

          You don't have to do all of these. But if, for some reason, you WANT to (masochist, much?), here's a shopping list of everything you need to buy, organized by where you can most likely find it.

          Grocery store (and/or Target)

          Rice Krispies cereal
          Oreos
          "Regular" chocolate and white chocolate chips and/or candy coating
          Marshmallows
          Shortening
          Cooking spray
          Ziploc bags
          Parchment or wax paper
          Tootsie Roll lollipops
          Pretzel rods
          Hershey Kisses
          Clearance candy canes
          Peep hearts
          Conversation hearts
          Butter
          Wine (don't question it)

          Craft store

          Tissue paper
          Card stock or scrapbooking paper in flower- and leaf- appropriate colors
          Glue dots
          Small hole punch
          Heart-shaped punch
          Sprinkles
          Cellophane bags
          Twist ties
          Fancy colored candy melts
          Lollipop sticks
          Cookie cutter
          Floral tape
          Floral wire

          * Target has some awesome V-Day sprinkles on the dollar aisle - don't pretend you don't know where it is.
          ** Does that word sound smug to anyone else?

          Wednesday, June 5, 2013

          Whine into Water

          So, I swear not all of these posts are going to have to do with gardening, because my current garden is on my 5x10 balcony. There just isn't that much I can do out there. That did not, however, stop me from producing this (the strawberry, the penny is just for scale. In my defense, the first strawberry to come off the balcony was, like 1/4 this size):

          Or rather, to be more accurate, stop me from purchasing the plant that produced it. Which I almost killed because I have a strict policy of Benign Neglect when it comes to my plants. Which doesn't work so well since I forget to water them for days on end.

          Problem: Plants dying because they would probably get more water in Arizona than they do on my balcony
          Solution: Water Globes! You know those pretty round glass things that you buy and stick in potted plants that slowly leak water into your soil as it dries out?
          2nd problem: Paying money for them seems like a waste. I mean surely, I can find something that will work just as well lying around my house, right?
          My solution: Booze.No, really!

          Materials:

          Empty wine and cider bottles. If you don't partake, any glass bottle will most likely work, or you can just sneak into your neighbor's recycle bins.

          Method:

          1. Water your plants first. Otherwise they'll just gulp the water out of your bottles and you'll need to refill, like, immediately.
          2. Rinse bottles
          3. Fill them with water
          4. Go outside, quickly invert bottle and shove into soil of plant. I find that if you act like you're screwing in a lightbulb, it works a little easier.
          5. Neglect away!

          Caution:

          If the water in your bottle is all gone in about 2 hours, either you didn't water the plants well enough to begin with, or the bottle wasn't shoved in far enough. Once you've gotten the bottle to a good depth, it should be easy to refill and re-insert in the same spot in the plant.

          The wine bottles last a few days in a large plant. I use the cider bottles for flowers and smaller pots, they last a day or two. There is some debate on the Internet that you should somehow cap the bottles and make small holes in the cap, such that it's more of a drip-irrigation thing. I found that just leaving the tops off and making sure the bottles are firmly inserted works just fine, and is easier to refill. I don't actually enjoy getting dirty, so this is an important feature.

          Monday, June 3, 2013

          Good cages make good tomatoes

          Or so I have been told. And this year I am finally heeding the advice. In previous seasons, I always grew patio or some other compact variety of tomato that looked cute but only yielded about 10-15 tomatoes total. This year, I decided to get adventurous and grow two regular-size Roma tomato plants (I was suckered in by the Heinz label! I could make my own ketchup! Curse you, Home Depot!) in two of the pots that I brought over from the old apartment.
          When I bought these darling little things, I wasn't even thinking about how to support large, luxurious limbs heavy with fruit, I was mainly trying to keep them from death-by-sandbox at the hands of my daughter. They beat the odds, survived, and got big enough that they started to list. Being that storm season is upon us, it occurred to me on the way home from Sesame Place yesterday that they needed a cage, which I do not own. I thought it through as mile after mile passed and finally settled on coat hangers. It could work. It should work. I could twist them and bend them into something totally usable with adorable curly-ques and then paint and distress them so they look like something you'd buy in a store in Old Towne called Ye Olde Farmhouse Crappe and I would be a DIY goddess.
          Well, one out of four ain't bad, is it?

          Materials:

          • 6 wire coat hangers (the full wire ones, not the cardboard tube ones. Extra points if they are all the same color)
          • Regular pliers (I'm sure they have an official name, but mine came in a tool kit from Ikea. "Ikea pliers?")
          • Needle-nose pliers
          Here's a shot of my supplies spread out on my couch, where I sat comfortably while creating this masterpiece.

          Method:

          1. Untwist all of the coat hangers and straighten them as best as you can. Step on them, pull them, use the pliers, a mallet, a hammer, whatever makes you happy. You're going for relative straightness here, don't worry about it too much.
          2. I used the needlenose pliers to curl one end of three of the hangers. I was hoping for attractiveness here, but the real goal was to keep my kid's eyes from getting poked out when she invariably smacked herself in the face with one.
          3. Using the same three hangers, about 12 inches down from the curl, I used the needlenose pliers to make a small loop, and then another loop about 12 inches down from that. (This sounds nice and simple on paper. It actually involves some elbow grease and a little swearing. I recommend, as with most DIY project, a glass of wine or a bottled adult beverage of your choice.)
          4. With the remaining 3 hangers, try to form them into something of a circle. I freely admit that I skipped this part, and other than unwinding the hangers, basically left them to their regular triangular shape. You will see the results later. Do the circles if you have the time and/or patience.
          5. Make a curl on one end of each circle with the needlenose pliers.
          6. Lay your three long hangers (that you added curls and loops to in steps 2-3) next to each other, with the loops and curls all facing the same way.
          7. Thread the non-curled end of each circle (that you made in step 4) through the bottom loop of each straight hanger. 
          8. Using your needlenose pliers again, curl the other end of the circle, and then "link" that curl to the one you made in step 5. This should complete a circle that runs through all three bottom loops of the straight hangers.
          9. Repeat steps 7-8 on the middle loop and top curl of the three straight hangers.
          10. Go outside and spread the three straight hangars out such that they form the points of a triangle. Holding each straight wire near the bottom, shove them into the ground around your plant. The circle hangars should keep the upright straight ones stable enough to support the whole contraption, unless you are growing  watermelons or something.
          And here is my hot mess finished product!

          Conclusions:

          I think the next time I will actually make the circular hangars actual circles vs. warped triangles. The reason for this is that the straight hangers tend to drift until all of them are in one corner of the "circular" ones (which are actually "triangular" because I am "lazy") and that...just isn't helpful. I've had to do a little retro-fitting with my pliers.
          So, there you have it. Not gonna make it into Ye Olde Crappe Shoppe anytime soon, but hopefully they will give the plants the support and encouragement they need.