

- Tootsie pop flowers
- Chocolate-dipped pretzel rods
- Chocolate kiss roses
- Upcycled candy cane hearts
- Oreo pops
- Chocolate-covered Peep hearts
- Rice Krispie Heart pops
- Master list of materials and ingredients for overachievers
1. Tootsie pop flowers
Can't take the credit for this photo, but you can see the ones I did in the photo at the bottom of the page.
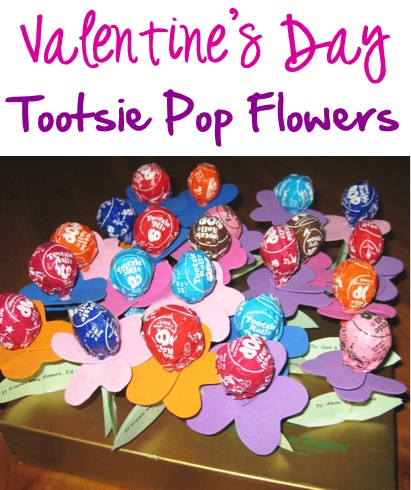
Required:
- Bag of Tootsie Roll pops
- 2 sheets of cardstock, scrapbooking paper, or foam
- Small hole punch
Optional:
- Heart shape paper punch (It won't work with the foam, but if you use paper it makes the process so.much.faster.)
- Green paper (for leaves)
- Scotch tape
2. Chocolate-dipped pretzel rods
 Required:
- Chocolate to melt (I'd say about 2 12-ounce bags of chocolate chips)
- 1 bag of pretzel rods
- Tall glass (microwave-safe)
- Tall cellophane bags and twist ties (Or Ziploc bags with the zips cut off and pipe cleaners cut into short pieces)
- Parchment or wax paper
Optional:
- Contrasting color of chocolate
- Sprinkles*
- Pour 1 bag of chocolate chips into your glass (or fill with chopped chocolate). You can go all the way to the top - it will take up less space as the chocolate melts. Zap in the microwave for 30 seconds, then stir (I used a wooden skewer). Repeat. You should be able to stir it at this point, and you want to, as many of the chips will melt as you stir. If even after your best stirring efforts there are lumps, zap it again for 15 seconds and stir again.*
- Open the bag of pretzel rods and spread your parchment or wax paper on a flat surface.
- Dip the pretzel rods into the chocolate, turning to coat well and shaking off the excess before laying the pretzel on the paper to dry. As the level of chocolate goes down, you may need to tip the glass to coat the pretzel as far up as you can.
- You'll probably have to refill the chocolate halfway through the bag. Use the same method as before.
- Melt the contrasting color of chocolate (My favorite method for this particular use is to nuke a couple of handfuls of chips in a mostly-closed Ziploc bag for 30 seconds, then massage the bag until it's smooth, snip off a corner, and go!) and drizzle over the coated pretzels. While the chocolate is still wet, shake sprinkles over the pretzels.
- Let the chocolate dry for a couple of hours. If you touch it lightly and it leaves a fingerprint, let it dry some more.
- Bag 'em and go!
3. Chocolate Kiss Roses

Required:
- Bag of Hershey Kisses
- Pink or red tissue paper (the kind you use to stuff gift bags and boxes)
- Floral wire (18 gauge worked great, but I also used pipe cleaners and heard a rumor that wooden skewers work)
- Floral tape
- Glue dots
Optional:
- Wired leaves
Method
I listened to the Internet on this one, but their advice produced slightly warped rosebuds and sore fingers. Plus, they took forever. My method produced a couple dozen flowers in the time it took to watch Downton Abbey.- Cut the flower wire to make between 9-12 inch pieces.
- Cut the tissue paper into 6-inch squares.
- Stick a glue dot on the bottom of a kiss and stick the bottom of another kiss to it.

- Put a glue dot on the side of one of the kisses, near the pointy end.
- Hold the end of one of the wires against the glue dot on the side.

- Center two pieces of tissue paper over the top pointy end of the candy. Pull the sides of the tissue out straight and crease.

- Wrap tissue clockwise around candy, holding the paper pretty firmly. Keep twisting all the way to the base of the candies. Secure with a bit of tape if needed.


- Holding one end of the floral tape against the bottom third of the candy portion, start pulling the tape gently and wrapping it around to form a stem. (Pulling the tape activates a mild wax that will make the tape stick to itself.)

- Once you get past the bulky portion at the end of the tissue paper, add two leaves and continue wrapping down the wire to the end. Just rip off the tape and smooth it down to finish.

4. Upcycled Candy Cane Hearts**
Not my picture, I can't take credit, but I thought y'all would like to know what they look like!

Required:
- Chocolate for melting (the amount depends entirely on how many candy canes you have, but don't try it with less than 8 oz.)
- As many leftover candy canes as you scrounge together. The link I'll post below uses the mini ones, but all I could find at the 90% off after-Christmas sale were the big ones, and they worked fine.
- Microwave safe bowl
- 6 inch lollipop sticks (You could use wooden skewers, just beware of the sharp tips)
- Cellophane bags and twist ties (Or Ziploc bags with the zips cut off and pipe cleaners cut into short pieces)
- Parchment or wax paper
- Heat-proof gloves (otherwise your fingertips get a little toasty)
- Sprinkles* or conversation hearts (can stick to the chocolate while it's wet)
- Contrasting color of chocolate
I used these instructions. The only thing I did differently was to use the big candy canes, which should be baked and extra minute or two to make them pliable.
5. Oreo Pops
 Required:
- Candy coating (or chocolate chips)
- 1 package of Oreos
- Microwave-safe bowl (a coffee mug works great for this)
- 6 inch lollipop sticks (or Popsicle sticks or wooden skewers, just beware of the sharp tips)
- Cellophane bags and twist ties (Or Ziploc bags with the zips cut off and pipe cleaners cut into short pieces)
- Parchment or wax paper
Optional:
- Sprinkles* or conversation hearts (can stick to the chocolate while it's wet)
- Contrasting color of chocolate
The instructions are here. I have good news and bad news here. You have to dig the trenches, or it just won't work. Yes, even if you buy Double Stuffed. The good news is that if you break it, you bite it.
6. Chocolate-covered Peep Hearts

Required:
- Candy coating (this recipe says 8 oz; you can also use chocolate chips)
- 2 tblsp vegetable shortening
- 1 package of Peep hearts (8 hearts)
- Tall glass (microwave-safe)
- 6 inch lollipop sticks (I have used Popsicle sticks or plastic forks before. You could also use wooden skewers, just beware of the sharp tips)
- Cellophane bags and twist ties (Or Ziploc bags with the zips cut off and pipe cleaners cut into short pieces)
- Parchment or wax paper
- Sprinkles* or conversation hearts (can stick to the chocolate while it's wet)
7. Rice Krispie Heart Pops

Required:
- Candy coating (or chocolate chips)
- Box of Rice Krispies cereal
- Bag of marshmallows
- 1/4 cup butter
- Large microwave-safe bowl
- Heart-shaped cookie cutters (any shape works, or instead of cutting out the treats, pour them directly into the wells of a well-greased muffin tin)
- Smaller bowl for melting chocolate
- 6 inch lollipop sticks (or Popsicle sticks or wooden skewers, just beware of the sharp tips)
- Cellophane bags and twist ties (Or Ziploc bags with the zips cut off and pipe cleaners cut into short pieces)
- Parchment or wax paper
- Cooking spray
Optional:
- Sprinkles* (can stick to the chocolate while it's wet)
- Contrasting color of chocolate
Method
- Line a cookie sheet with parchment or wax paper.
- Melt butter in the large bowl in the microwave (30 seconds should do it). Dump in the bag of marshmallows and stir to coat.Microwave for 45 seconds.
- SPRAY A SPATULA WITH COOKING SPRAY. It's important. Don't question it.
- Stir the gooey mess, then nuke for another 30-45 seconds. Stir again until it's a uniform melted goo consistency. Add Rice Krispies right away and stir.
- SPRAY THE SPATULA AGAIN WITH COOKING SPRAY.
- Pour the contents of the bowl onto the lined cookie sheet and use the spatula to flatten it out until it's roughly an inch thick. Let it cool for about half an hour, it'll be easier to cut.
- SPRAY THE COOKIE CUTTER WITH COOKING SPRAY.
- Cut out the hearts and lay them on parchment or wax paper.
- Melt a few spoonfuls of chocolate in a bowl. Dip the end of each lollipop stick into the melted chocolate before sticking it into the point of the heart-shaped treats.
- Once all of the treats have sticks, melt more chocolate(s) and drizzle over the hearts. Add sprinkles while the chocolate is still wet. Let the chocolate dry completely before bagging.
Master list of ingredients for overachievers

Grocery store (and/or Target)
Rice Krispies cerealOreos
"Regular" chocolate and white chocolate chips and/or candy coating
Marshmallows
Shortening
Cooking spray
Ziploc bags
Parchment or wax paper
Tootsie Roll lollipops
Pretzel rods
Hershey Kisses
Clearance candy canes
Peep hearts
Conversation hearts
Butter
Wine (don't question it)
Craft store Tissue paper
Card stock or scrapbooking paper in flower- and leaf- appropriate colors
Glue dots
Small hole punch
Heart-shaped punch
Sprinkles
Cellophane bags
Twist ties
Fancy colored candy melts
Lollipop sticks
Cookie cutter
Floral tape
Floral wire
* Target has some awesome V-Day sprinkles on the dollar aisle - don't pretend you don't know where it is.
** Does that word sound smug to anyone else?


