Tuesday, April 29, 2014

In a curry? Salmon cakes to the rescue!

There are days when I just have weird leftovers in my house. Like when I decided to try this thing I saw on Pinterest about growing green onions from the roots of a previously used plant (totally works). And I also happened to have an excess of leftover salmon because my daughter decided she wanted "pink chicken" all the time and my husband and I were well and truly tired of it. So back to Pinterest I went, and since I was being all "low-carb lalalala" at the time, adapted a recipe I found for West Indies Salmon Cakes. It didn't take long, and we had lovely golden-brown low-carb not-just-salmon goodness! 


2 cups flaked salmon (the original blogger used canned)
2 cloves garlic, minced
1/3 c onion, minced (I had green onions, so that's what I used, and it worked fine)
1/2 c flour (For the low-carb version, I used half coconut flour and half almond meal)
2 tsp baking powder
1 large egg, whisked
1 tsp curry powder
1/2 tsp cumin
1/2 tsp salt
Pepper to taste
1/2 tsp crushed red pepper

Combine all ingredients in a large bowl and mix until well combined. With hands, form 6 patties and set aside. In a frying pan, pour a tbsp or two of oil. Heat over medium high heat. Fry patties for 2-3 minutes each side until done. If freezing, place between layers of wax/parchment paper in freezer bags and freeze. Thaw and cook as above.

An a-side

Stuck for side dishes? Sick of salad? Take any non-watery vegetable you have left over in the fridge or freezer (from that misguided decision you made to join a CSA by yourself), cut it into large chunks (or just in half, whatever), rub it in olive oil, salt, pepper, and whatever seasoning you like (I use Italian seasoning and garlic powder), and roast it in a single layer on a large baking sheet for 20 minutes or so, until the edges of the veggies turn dark brown. Start these first; by the time the salmon cakes are done, the veggies will be, too.


Thursday, February 6, 2014

All you need is love. And candy. And a trip to the craft store. But that's it.

To raise money for our annual church retreat, the choir (my peeps!) and I banded together for a "crafternoon" full of sweet sweet goodness. We made candy bouquets to sell, which involved mass-producing 7 different kinds of Valentine-themed candies on sticks, then putting them in vases filled with, you guessed it, more candy.

Just one of these projects would probably make enough for a child's classroom, or a nurse's station, or your back-of-the-closet secret after a hard day. I'm listing them here by the fewest number of ingredients.  If you're not diabetic by the time you're done, you have noone to blame but yourself!

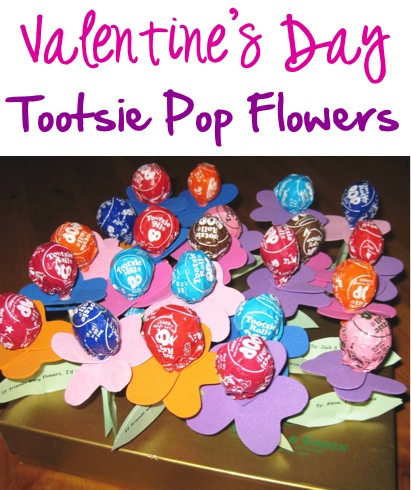
  1. Tootsie pop flowers
  2. Chocolate-dipped pretzel rods
  3. Chocolate kiss roses
  4. Upcycled candy cane hearts
  5. Oreo pops
  6. Chocolate-covered Peep hearts
  7. Rice Krispie Heart pops
  8. Master list of materials and ingredients for overachievers

1. Tootsie pop flowers

Can't take the credit for this photo, but you can see the ones I did in the photo at the bottom of the page.

Required:

  1. Bag of Tootsie Roll pops
  2. 2 sheets of cardstock, scrapbooking paper, or foam
  3. Small hole punch

    Optional:

    • Heart shape paper punch (It won't work with the foam, but if you use paper it makes the process so.much.faster.)
    • Green paper (for leaves)
    • Scotch tape
    This one is also very easy. I used the instructions from here. If you have trouble getting the petals to stay up once they're on the stick, wrap some scotch tape around the stick.

    2. Chocolate-dipped pretzel rods

    Required:

    1. Chocolate to melt (I'd say about 2 12-ounce bags of chocolate chips)
    2. 1 bag of pretzel rods
    3. Tall glass (microwave-safe)
    4. Tall cellophane bags and twist ties (Or Ziploc bags with the zips cut off and pipe cleaners cut into short pieces)
    5. Parchment or wax paper

    Optional:

    • Contrasting color of chocolate
    • Sprinkles* 
    This one is so easy!!
    • Pour 1 bag of chocolate chips into your glass (or fill with chopped chocolate). You can go all the way to the top - it will take up less space as the chocolate melts. Zap in the microwave for 30 seconds, then stir (I used a wooden skewer). Repeat. You should be able to stir it at this point, and you want to, as many of the chips will melt as you stir. If even after your best stirring efforts there are lumps, zap it again for 15 seconds and stir again.*
    • Open the bag of pretzel rods and spread your parchment or wax paper on a flat surface. 
    • Dip the pretzel rods into the chocolate, turning to coat well and shaking off the excess before laying the pretzel on the paper to dry. As the level of chocolate goes down, you may need to tip the glass to coat the pretzel as far up as you can.
    • You'll probably have to refill the chocolate halfway through the bag. Use the same method as before.
    When all the pretzels are dipped, you can just just walk away. But where's the challenge in that???
    • Melt the contrasting color of chocolate (My favorite method for this particular use is to nuke a couple of handfuls of chips in a mostly-closed Ziploc bag for 30 seconds, then massage the bag until it's smooth, snip off a corner, and go!) and drizzle over the coated pretzels. While the chocolate is still wet, shake sprinkles over the pretzels.
    • Let the chocolate dry for a couple of hours. If you touch it lightly and it leaves a fingerprint, let it dry some more.
    • Bag 'em and go!

    3. Chocolate Kiss Roses


    Required:

    1. Bag of Hershey Kisses
    2. Pink or red tissue paper (the kind you use to stuff gift bags and boxes)
    3. Floral wire (18 gauge worked great, but I also used pipe cleaners and heard a rumor that wooden skewers work)
    4. Floral tape
    5. Glue dots

      Optional:

      • Wired leaves 

      Method

      I listened to the Internet on this one, but their advice produced slightly warped rosebuds and sore fingers. Plus, they took forever. My method produced a couple dozen flowers in the time it took to watch Downton Abbey.
      • Cut the flower wire to make between  9-12 inch pieces.
      • Cut the tissue paper into 6-inch squares.
      • Stick a glue dot on the bottom of a kiss and stick the bottom of another kiss to it. 

      • Put a glue dot on the side of one of the kisses, near the pointy end.
      • Hold the end of one of the wires against the glue dot on the side.

      • Center two pieces of tissue paper over the top pointy end of the candy. Pull the sides of the tissue out straight and crease.


      • Wrap tissue clockwise around candy, holding the paper pretty firmly. Keep twisting all the way to the base of the candies. Secure with a bit of tape if needed.


      • Holding one end of the floral tape against the bottom third of the candy portion, start pulling the tape gently and wrapping it around to form a stem. (Pulling the tape activates a mild wax that will make the tape stick to itself.)

      • Once you get past the bulky portion at the end of the tissue paper, add two leaves and continue wrapping down the wire to the end. Just rip off the tape and smooth it down to finish.

      To be fair, I stole some of the instructions from here.

      4. Upcycled Candy Cane Hearts**

      Not my picture, I can't take credit, but I thought y'all would like to know what they look like!

      Required:

      1. Chocolate for melting (the amount depends entirely on how many candy canes you have, but don't try it with less than 8 oz.)
      2. As many leftover candy canes as you scrounge together. The link I'll post below uses the mini ones, but all I could find at the 90% off after-Christmas sale were the big ones, and they worked fine.
      3. Microwave safe bowl
      4. 6 inch lollipop sticks (You could use wooden skewers, just beware of the sharp tips)
      5. Cellophane bags and twist ties (Or Ziploc bags with the zips cut off and pipe cleaners cut into short pieces)
      6. Parchment or wax paper
      Optional:
      • Heat-proof gloves (otherwise your fingertips get a little toasty)
      • Sprinkles* or conversation hearts (can stick to the chocolate while it's wet)
      • Contrasting color of chocolate
      I used these instructions. The only thing I did differently was to use the big candy canes, which should be baked and extra minute or two to make them pliable.

      5. Oreo Pops

      Required:

      1. Candy coating (or chocolate chips)
      2. 1 package of Oreos
      3. Microwave-safe bowl (a coffee mug works great for this)
      4. 6 inch lollipop sticks (or Popsicle sticks or wooden skewers, just beware of the sharp tips)
      5. Cellophane bags and twist ties (Or Ziploc bags with the zips cut off and pipe cleaners cut into short pieces)
      6. Parchment or wax paper

        Optional:

        • Sprinkles* or conversation hearts (can stick to the chocolate while it's wet)
        • Contrasting color of chocolate
        The instructions are here. I have good news and bad news here. You have to dig the trenches, or it just won't work. Yes, even if you buy Double Stuffed. The good news is that if you break it, you bite it.

        6. Chocolate-covered Peep Hearts


        Required:

        1. Candy coating (this recipe says 8 oz; you can also use chocolate chips)
        2. 2 tblsp vegetable shortening
        3. 1 package of Peep hearts (8 hearts)
        4. Tall glass (microwave-safe)
        5. 6 inch lollipop sticks (I have used Popsicle sticks or plastic forks before. You could also use wooden skewers, just beware of the sharp tips)
        6. Cellophane bags and twist ties (Or Ziploc bags with the zips cut off and pipe cleaners cut into short pieces)
        7. Parchment or wax paper
          Optional:
          • Sprinkles* or conversation hearts (can stick to the chocolate while it's wet)
          These instructions work great!

          7. Rice Krispie Heart Pops


          Required:

          1. Candy coating (or chocolate chips)
          2. Box of Rice Krispies cereal
          3. Bag of marshmallows
          4. 1/4 cup butter
          5. Large microwave-safe bowl 
          6. Heart-shaped cookie cutters (any shape works, or instead of cutting out the treats, pour them directly into the wells of a well-greased muffin tin)
          7. Smaller bowl for melting chocolate
          8. 6 inch lollipop sticks (or Popsicle sticks or wooden skewers, just beware of the sharp tips)
          9. Cellophane bags and twist ties (Or Ziploc bags with the zips cut off and pipe cleaners cut into short pieces)
          10. Parchment or wax paper
          11. Cooking spray

          Optional:

          • Sprinkles* (can stick to the chocolate while it's wet)
          • Contrasting color of chocolate

          Method

          • Line a cookie sheet with parchment or wax paper.
          • Melt butter in the large bowl in the microwave (30 seconds should do it). Dump in the bag of marshmallows and stir to coat.Microwave for 45 seconds.
          • SPRAY A SPATULA WITH COOKING SPRAY. It's important. Don't question it.
          • Stir the gooey mess, then nuke for another 30-45 seconds. Stir again until it's a uniform melted goo consistency. Add Rice Krispies right away and stir.
          • SPRAY THE SPATULA AGAIN WITH COOKING SPRAY.
          • Pour the contents of the bowl onto the lined cookie sheet and use the spatula to flatten it out until it's roughly an inch thick. Let it cool for about half an hour, it'll be easier to cut.
          • SPRAY THE COOKIE CUTTER WITH COOKING SPRAY.
          • Cut out the hearts and lay them on parchment or wax paper.
          • Melt a few spoonfuls of chocolate in a bowl. Dip the end of each lollipop stick into the melted chocolate before sticking it into the point of the heart-shaped treats.
          • Once all of the treats have sticks, melt more chocolate(s) and drizzle over the hearts. Add sprinkles while the chocolate is still wet. Let the chocolate dry completely before bagging. 

          Master list of ingredients for overachievers

          You don't have to do all of these. But if, for some reason, you WANT to (masochist, much?), here's a shopping list of everything you need to buy, organized by where you can most likely find it.

          Grocery store (and/or Target)

          Rice Krispies cereal
          Oreos
          "Regular" chocolate and white chocolate chips and/or candy coating
          Marshmallows
          Shortening
          Cooking spray
          Ziploc bags
          Parchment or wax paper
          Tootsie Roll lollipops
          Pretzel rods
          Hershey Kisses
          Clearance candy canes
          Peep hearts
          Conversation hearts
          Butter
          Wine (don't question it)

          Craft store

          Tissue paper
          Card stock or scrapbooking paper in flower- and leaf- appropriate colors
          Glue dots
          Small hole punch
          Heart-shaped punch
          Sprinkles
          Cellophane bags
          Twist ties
          Fancy colored candy melts
          Lollipop sticks
          Cookie cutter
          Floral tape
          Floral wire

          * Target has some awesome V-Day sprinkles on the dollar aisle - don't pretend you don't know where it is.
          ** Does that word sound smug to anyone else?

          Tuesday, January 28, 2014

          Sugar-free Chocolate "Tradeoff" Trifle

          The reality is this: Sugar-free does not mean carb-free. Nor does it mean math-free. Doing truly low-carb dieting involves lots of counting and adding and measuring and research, and, well, Mommy don't got time for that. So I do the best I can, avoid what I know is truly bad, and sometimes, I choose to believe what the packaging tells me. It may mean that I am eating more carbs than I should have in a day and more chemicals than I would put on my face to banish wrinkles, but if I can suspend my disbelief long enough, I can eat this dish pretty much guilt free. And I want to. Because unlike pretty much EVERY low-carb chocolate chip cookie recipe I have EVER tried, it's actually good.

          Materials

          • 1 box of instant, sugar free chocolate pudding
          • 1 box of instant, sugar free white chocolate (or vanilla, or whatever) pudding
          • 4 cups milk
          • 1 packet Starbucks Via
          • 1 tub sugar-free Cool Whip*
          • 1 box sugar-free Oreos**
          • 8 oz sugar-free chocolate chips
          • 8 oz heavy cream


          Method

          • Mix 2 cups of milk with each packet of pudding. Divide the container of cool whip and mix half into each batch of pudding. Add the Via packet to one of the pudding batches and stir until incorporated. 
          • Put the heavy cream in a microwave-safe bowl and microwave on high for a minute. remove from the microwave, add the chocolate chips, and stir until smooth.***
          • Twist open the Oreos and use the halves to make a single layer at the bottom of a casserole dish (I use an old round one, if you're working with squares I would stick with a 9x9).
          • Pour one of the puddings over the cookie layer.
          • Add another cookie layer.
          • Drizzle half of the chocolate mixture over the cookie layer.

          • Pour the other pudding over the cookie layer.
          • Drizzle with remaining chocolate mixture.
          • Hide in back of fridge for as long as you can stand it.

          Confession

          I tried to do a carb count on this. I am sure that most 12 year olds are better at math than I am and could correct me, but anyway, for 1/2 cup, I think it's around 11 grams of carbs. Not out of the park, but not horrible, either. IF you can stick to 1/2 cup. But I still don't feel bad, because really, this isn't the sprint of a Hollywood Cookie Diet, it's a marathon of saying "no thank you" when someone passes the rolls, and once in a while saying "OMG yes" to a milkshake because life is short. Consider this recipe somewhere in the middle.:)

          *Even if your grocery store doesn't carry sugar-free, the regular stuff is actually pretty low-carb anyway. Just don't go for the extra creamy or fat-free versions, they have a lot more sugar.
          **These can be tricky to find. Basically, if your store carries ANY sugar free cookies, you can use them.
          ***Hey, guess what? You just made ganache!!!! 

          Thursday, January 16, 2014

          The Good Shepherd('s Pie)

          For me, winter (post-holiday) is an easier time to go low-carb, thanks in large part to the fact that you don't have as much of what I like to call "salad guilt." When it's 95 degrees out, it just seems like the universe judges you for not going to Chop't or some other gimmicky salad joint every day and getting something made from locally-sourced dandelions and wunderberries and Mystic Tan. You can't order pot roast in July. It's barbaric. Or at least the ads on the Metro make you think so. And yes, I get that salads are, by nature, low-carb. But they're salad.
          It's not that I am anti-salad. I am just not excited about them. It's like how my three-year-old feels about anything other than frosting. It'll do if you're 5 minutes from starvation but otherwise, why bother?
          Winter is the time for pot roast. And pub food. And cheese. So in celebration, I devised a low-carb version of Shepherd's pie that turned out pretty good, only involved two pots and a casserole dish, and can be ready to pop in the oven in less time than it takes to make a frozen pizza. Yes, I know that for a fact. Don't judge me.

          Materials

          As with most things I make, you can substitute a lot in here. This is just how I did it because I happened to have most of the ingredients languishing in the freezer or fridge. You can swap out the ground meats and the veggies (except the cauliflower, unless, of course, you do mashed potatoes) for whatever you have lying around or whatever your kids will eat.

          • 2 bags of frozen cauliflower florets (because I hate chopping)
          • Stick of butter or margarine (I guess you could sub sour cream or plain yogurt. Killjoy.)
          • 1 tblsp olive oil
          • 1lb ground bison
          • 1lb ground turkey breast
          • 1 bag frozen chopped onions
          • 3 tblsp. Worcestershire sauce
          • 1 small bay leaf
          • 1.5 cups beef broth (or 1 can)
          • 1 teaspoon steak seasoning
          • 1/2 cup red wine (or beer)
          • 1 1/2 cups baby carrots
          • 1 1/2 cups frozen peas
          • 1 cup shredded cheddar cheese (optional)

          Method

          • Preheat oven to 375.
          • Dump the cauliflower and 1/4 cup frozen chopped onions in a large pot or microwave steamer with an inch or so of water.  Steam until fork tender.
          • While the cauliflower steams, in a separate pot, add the olive oil, the rest of the chopped onions, and the ground meats. Cook on medium-high heat until the meat is mostly browned, and then add the broth, Worcestershire, bay leaf, steak seasoning, and wine. Bring to a boil, then add salt or pepper to taste. Add carrots to the top of the meat mixture and simmer until they are tender.
          • While the meat mixture simmers, dump the frozen peas in a strainer and rinse with cold water until they are thawed.
          • Drain the cauliflower and add butter. Using an immersion blender (or a potato masher, but seriously, you need an immersion blender), blend until smooth. Add salt and pepper to taste.
          • Turn off the meat mixture and stir in the peas. Pour into casserole dish, then spread the mashed cauliflower on top.Top with cheese and bake for about 30 minutes, or until cheese is melted and/or the mashed cauliflower is lightly browned in spots.


          Wednesday, November 6, 2013

          Mid-carb crisis: I'm doing just peachy, thanks

          Politely decline the bread basket at lunch and explain, also politely, that you are on a low-carb diet, and your table companions tend to have two reactions: sympathy or thinly-veiled horror, as though you might club the lowest-moving server and eat him raw. I can understand it. It sounds like a bleak existance. No noodles. No fries. No doughnuts. No joy. Just...meat.

          My husband started it first. He just wanted to try it, and he did it! He really did it! Despite the proof that you could go on living without potato chips, I dug my heels in for a year, siting the well-documented psychological benefits of chocolate as possibly the only way to get through the year we were all having. But get through it we did, and I jumped on the wagon with him.

          The reality is that I'm not actually doing the "low-carb thing" really. I like to think of it as "mid-carb," because while I might be able to give up bread and rice and french fries, grudgingly, this Mommy cannot live by bacon alone. So while breads, rice, pasta, potatoes, and sweets are off the menu, pretty much anything else is fair game. I am too lazy and too averse to pain to quibble over whether that cooked carrot is grounds for dietary self-flagellation.

          The biggest challenge, of course, is that I simply cannot live in a world without sweets. One of the things I hate about low-carb diets is the whole sugar substitute question, and you can use Splenda all you want, but you have to be better at self-deception than I am if you don't think it tastes a little like tires. So I experiment with baking. Like, a lot. And as I've said before, when you use recipes as only a guideline, you cannot be afraid to fail. Because you're going to. 

          So when I bought a box of gorgeous late-season peaches at Costco only to discover that they were California (blah) and not Eastern (Hallelujah!), I found myself with a golden opportunity to experiment with a low-carb cobbler-type thing. I decided to go with a few spoonfuls of Truvia sugar blend for the filling, which combines the real stuff with some sugar alcohols and other things not made of Splenda. Yes, it does have carbs, but only 1/4 of what regular sugar has, and it's also magically sweeter, so you use less. Also, it doesn't taste petroleum-based.

          For the crumb topping, I used ideal brand brown sugar sweetener and almond meal, which is just peeled, blanched almonds ground into a powder. You can buy it already prepared or you can do it yourself (...if you're a masochist). There are other low-carb flour alternatives out there, but many of them either taste super weird or turn your large intestine into the Hindenburg. Or both!

          Materials:

          • 6-7 ripe peaches, peeled and sliced (or about 4 cups frozen. I think this would also be great with blueberries)
          • 3 tbsp Truvia baking blend 
          • 1/2 teaspoon apple pie spice
          • 1/4 teaspoon ground ginger
          • 1/3 c. ideal brown sugar sweetener
          • 2 cups almond flour
          • 1 stick butter

          Method

          • Preheat oven to 350.
          • Spray a 9x 9 dish with cooking spray
          • Add sliced peaches and sprinkle with Truvia, apple pie spice, and ginger. 
          • In a large bowl, with a pastry blender or your fingers, rub together the almond flour, butter, and ideal until it looks kinda like wet sand. 
          • Sprinkle almond mixture evenly over peaches and bake for about 30 minutes, until it gets brown in spots.

          Conclusion


          I was very pleased with how this turned out! It's not too sweet, but when you haven't eaten sugar in 2 weeks, it's dreamy. Add some sugar-free vanilla ice cream and you can almost, almost forgive it for not having more carbs. But at least it has butter, right? 

          Tuesday, October 29, 2013

          Hat Trick

          I do cakes for love, not money.
          I truly, truly respect anyone who does this stuff for a living. I usually take on a project for a friend or family member, get all excited about it, spend countless hours plotting out the details in my head, then inevitably, the cake cracks, the piping bag bursts, the "goldenrod yellow" food coloring is more of a "traffic cone orange," I can't find my leaf tip ANYWHERE and the fondant cracks every time I look at it. In short, I am always up at 3am the day the cake is "due" doing absurd things with duct tape and Ziploc bags.
          Which is why this cake was such a wonderful, refreshing surprise. It went...fine.


          The hardest part was deciding on the color (lemon yellow is a much closer approximation of its packaging). This is a cake that I think anyone could reproduce with the right tools, a little patience, and a handful of YouTube videos.

          Materials

          You can pick up all of the equipment listed here at Michael's or your local craft store. I've linked out to Amazon just so you can see what everything looks like.
          • Cake turntable or Lazy Susan put on top of a box or a big cake pan or something.
          • Icing comb
          • Ziploc freezer bags, any size larger than the snack version*
          • Cake pans: ideally, two 8-inch round pans, 1 12-inch round pan, and an oven-safe bowl with a diameter of 8 inches at the rim.** 
          • Cake plate or 12 to 14 inch round cake board
          • 1 8-inch round cake board
          • 1 6 inch round cake board
          • Icing tip 104
          • Piping bags
          • Food coloring (your choice-I used leaf green, lemon yellow, and sky blue)
          • 2 large batches of buttercream frosting (you can make whatever you like, you'll just need a LOT of it. Like, 4 pounds. I used the same recipe as my Cupcakeasaurus, just double it)
          Method
          • Bake your cakes in the pans or sizes indicated. You can use any recipes you like; for this cake, I used an entire recipe Kentucky bourbon butter cake for the 12-inch layer (the "brim" of the hat) and a 2 chocolate box mixes (gasp!***) for the 8-inch layers (which, when stacked, make up the "crown").
          • Now it gets fun! Put your 12-inch cake on the cake plate. If the top is "domed," level it off with a bread or cake knife or even some dental floss! (If you have NO IDEA what I am talking about, watch the video.)
          • Give it a nice crumb coat (that's just a thin layer of frosting over the whole thing-don't worry about the cake showing through, you're going to add so many ruffles to this thing!)
          • Tint 1 whole batch of buttercream frosting the "base" color (lemon yellow, in this case)
          • Fit a large piping or freezer bag with the 104 icing tip and fill 'er up with yellow frosting. (For more than you ever wanted to know about piping bags, watch the video.)

          • Starting at the bottom of the layer and working in concentric circles, make ruffles using the method in this video until there's roughly an 8-inch circle of unadorned cake on top.

          • Stick the whole thing in the fridge.
          • Stack, fill, and crumb coat your 2 8-inch layers on the 8-inch cake board using untinted frosting and/or filling of your choice.**** 
          • Put the cake on the turntable, if you haven't already.
          • Place a 6-inch cake board on top of the 8-inch layers.
          • Place the bowl-shaped cake flat-side down on the cake board.
          • Do a crumb coat.
          • Using the yellow icing, generously frost the assembled "crown" of the cake. It's doesn't have to be perfect, but it should be thick.
          • Holding the icing comb perpendicular to the cake, "drag" the teeth through the frosting, while slowly turning the turntable. You'll need to wipe off the comb fairly regularly, and it might take a few tries to get the hang of it, but eventually, it should look like a nice striped texture.
          • Put this cake in the fridge.
          • While both cakes are chilling, grab your untinted icing and divide it into 3 parts. Tint one part green (for the leaves), one part whatever color you want the ribbon to be (I did sky blue), and either leave one part the untinted color (for the flowers) or color it however you like.
          • Take the cakes out of the fridge and gently put the "crown" of the cake on top of the "brim." Bad things can happen during this process. Just go slow, and remember that you can always fix whatever you mess up.It's only frosting.
          • Using whatever is left in your yellow piping bag, add a row or two of ruffles around the base of the crown part of the cake, just to make the "hat" look seamless.
          • Using an icing tip or just a Ziploc bag with the corner clipped off, create a "band" around the base crown of the cake (mine is sky blue, and was done with a large petal tip, because that's what I had).
          • Watch this video, and then create your choice of flowers.

          • Watch this video, and add the leaves.

          • Add any additional ribbon "streamers."
          • Pour yourself a glass of wine - you've earned it! AND YOU'RE DONE!


          * I say this as a brand name because in this case, it matters. You don't have to get the fancy zipper-topped ones and definitely DO NOT get the pleated bottom ones. The good old-fashioned, square baggie will work fine, but it must be strong, or bad things WILL happen.
          **You can size up or down, just do so proportionally, and if all you have are square or rectangular pans, you can carve out circles of the right sizes - what happens to all those lovely cake scraps is your little secret.
          ***Box cake mixes, especially chocolate, are not bad, when you doctor them appropriately. I always add a Starbuck's Italian Roast Via to chocolate cake and brownie mixes. It really brings out the chocolate.
          ****I added a few tablespoons of cocoa and a packet of Via to some of the basic buttercream and used it to fill and crumb coat this part of the cake. Yummy!


          Tuesday, October 22, 2013

          When life gives you leftovers, make a casserole!

          There are times in life when you have to make do with what you have. My extremely supportive and patient family has learned a lot about that in recent years, as I was trying to take care of my Dad and hold down a job and basically just keep body and soul together for all of us. 

          Sometimes after a not-so-hard day, I just wasn't in the mood to cook (thank God for the 24-hour diner across the street). And sometimes, around dinner time but long before the end of an excruciating day, I decided right then was an excellent time to cook something new and involved. 

          So eventually, I learned that more than any other dish, the casserole is the one where you really can just open the fridge, grab whatever odds and ends you have floating around in there, and add them to the ingredient list.* That said, there are certain staples I am not allowed to run out of, because in a pinch, you can use them to make a casserole out of darn near anything. 
          Those things are:
          • Shaped pasta and/or rice (We are trying to reduce carbs, so Dreamfields it is)
          • Wine (duh!)
          • Frozen boneless, skinless chicken breasts and/or thighs
          • Frozen diced onions
          • Frozen vegetables
          • Cheese
          • Some kind of shelf-stable goo ("cream of" soup, gravy mix, onion soup mix, etc.)**
          • Various herbs and spices (I keep a tubes of garlic and basil in my fridge at all times)

          Method

          If you are lucky enough to have the ingredients already precooked (or scavenged, whatever), skip to this part.  If you're starting from just the ingredients in your always-on-hand-stash, here's the easiest way I've found to do everything with the least number of dirty dishes.:)
          • In a large stock pot over medium-high heat, saute about 1/2 cup onions and a clove or two of garlic in olive oil for a few minutes (they don't have to be done done, and in fact, you can skip this step if you want). 
          • Add a cup or so of wine, and roughly the same amount of water. Add some salt, but don't go nuts - you'll be adding cheese and goo later.
          • Add 2 good-sized chicken breasts or 4 thighs to the pot (if frozen, don't worry about thawing it), cover, and bring to a boil. Cook for about 20 minutes.***
          • Remove the chicken from the pot and shred when it is cool enough to touch. 
          • Add enough water to the pot to cook pasta. Bring to a boil.
          • At about the halfway point of the noodle cooking process (if package says 7 minutes, do this at 3), add a couple handfuls of frozen vegetables. Bring water back to a boil; when pasta is done, drain the whole pot.
          • This is the easy part. Mix it all together! Be sure to include the goo, seasonings (basil works well with chicken!), and cheese.
            Important rule of thumb: mix the cold or room-temp stuff together first, then add the hot.
            If the mix looks dry, you can use some reserved cooking liquid or wine. 
          • Pour into a casserole dish and cover with cheese. 
          • Bake at 350 until the top is browned in spots. See?

          *For instance, we went to a pumpkin patch thing last weekend and were able to pick out a "free" pumpkin on the way out. Well, right alongside those adorable little pumpkins were acorn squash! Hello, casserole!
          **Goo is important, otherwise the casserole can be dry. If you don't have any (or don't believe in it on principle), you can always use wine or broth. I actually prefer a dry packet of gravy mix mixed with wine (instead of the water it calls for).
          ***I never time anything, I just check it periodically to see if it's done yet. Also, if your chicken has bones in it, it takes longer.